
To adjust the level of detail shared on your Microsoft 365 calendar, please follow these steps:
Go to https://office365.illinoisstate.edu and log in with your full ISU email and password.
Once logged in and on the home page, click the Apps button on the left pane to access the calendar option. [Step 1]
Click the Calendar tile to open the Calendar app. [Step 2]
With your Calendar open, click on Share at the top-right corner.

[Step 3: Image demonstrating the Share option]
Note: If you have multiple Calendars, select the Calendar Name you wish to adjust the permission level for.
In the Share window, choose the access level for individuals who might have access to your Calendar. [Step 4: Guide on choosing the access level for the shared calendar]

“People in My Organization (My Organization)” controls accessibility for the campus community.
To keep your Calendar private, select “Not Shared.”

To share your calendar with specific ISU members, type their name in the bar at the top and click Share. After choosing their access level, they will receive an email invitation to view your calendar.
Exit the window to save your changes.
Managing Calendar Visibility in Outlook for Windows:
- Open Outlook.
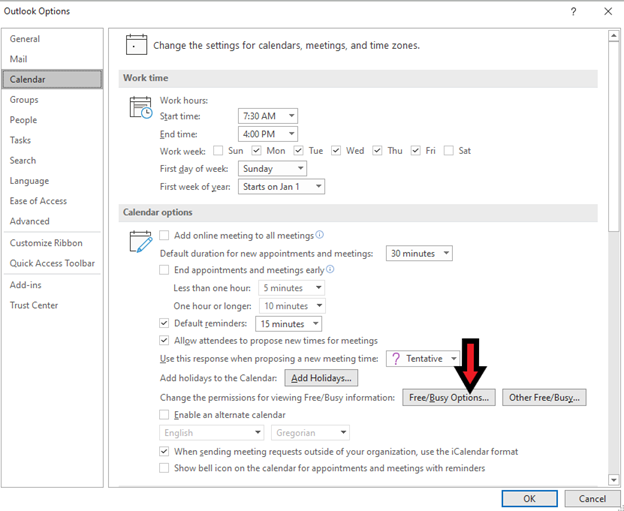
- Click File → Options → Calendar.
- Click the Free/Busy Options… button under Calendar Options. [Step 5: Visual aid for locating the Free/Busy Options button]
- Adjust the default permission level to None and uncheck the Folder Visible box.
- Click Apply.
- The Calendar will now be hidden from all university members.
Managing Calendar Visibility in Outlook for Mac
- Open Outlook and go to Calendar (located at the bottom left corner of Outlook, next to an envelope icon).
- Click Home to view your calendar permissions. Select Calendar Permissions to make edits.
- Modify the default identity to a permissions level you are comfortable with. To remove a person or organization from the list of individuals who can view the calendar, click the name, then when it’s highlighted, click the Minus (-) button at the bottom left corner of the window, and then click Done.
- The Calendar will now be hidden from all university members.